
This is a guide to making smoothly looped GIF, or cinemagraph. The process is a combination of two disciplines: making the loop and making the GIF.
It’s important to note up front that in this guide, both of these steps are accomplished with software in the Adobe Creative Suite. Any prosumer-level-or-better video editing software should be able to make the loop with the logic presented here. I’ll use Photoshop to make the GIF since it’s the most comprehensive tool I’ve seen. Other GIF outputters give less control over similar options, so you might still get something out of checking that section out if you don’t have this software.
But first let’s cover a little background. The idea of using looped video is to present a timeless moment with a little bit of magic to entrance your viewers. I also have found that the medium really lends itself to certain subject matter.
There are some things to be aware of before we get into the how-to. As a format, GIFs are not the cleanest ways to present looped motion on the web. To load with reliable speed, the image should be less than 1MB, which often means the animation is limited to 20 frames, the frame size is limited to 600 pixels or so and the image will be subject to compression.
So why would anyone bother to work in this medium? It all comes down to accessibility. At the time of this writing, the GIF is the only file format that will autoplay across any browser. HTML5 video allows for higher-resolution loops with longer durations, but Apple mobile devices specifically disallow autoplay from any kind of video. This means a huge chunk of your viewership could miss out on what is supposed to be a subtle, magical addition of motion to a story.
Remember the GIF is just half of the process — it’s really just the delivery method for the loop.
Making a smooth loop:
It all starts in camera.
The main thing you need here is brevity and stability. When out shooting, look out for recursive motion. This could be wind rustling a tree, smoke rising, someone blinking or cars passing by. Hold still.* Best to be on a tripod, but often steady hands and an in-lens image stabilizer will do the trick. Decent loops also often come organically out of shooting for straight video stories, like downtime between interview questions.
*There are some cases when this rule can be broken.
Bring the clips into a nonlinear editing program (I’m using Premiere).
Scan for the most complete loop.
This varies by subject, and there are two kinds of motion to look for: cyclical and oscillating. You’ve seen the latter as Boomerangs; it’s not often effective at making a subtle loop and usually makes your clip longer, which affects the eventual GIF file size. The former is much better for making a mind-boggling loop.
Cyclical: Look for moments at the beginning and end of a clip that look the same.
Oscillating: Find moments with motion that allows the sudden reversal to be hidden. Portraits often can only be made with this method.
Construct the loop.
Cyclical
-Copy and paste the clip so it overlaps itself.
-Add a transition. Dissolves do the trick more often than not
-Clip the back end, then remove the same length from the front end. This ensures the end of the loop matches the start.
-Workshop it. If you see a jump mid-dissolve, maybe you can shift timing to find a sweet spot.
Oscillating
-Copy and paste the clip one after another.
-Reverse the second clip.
-Remove one frame from the end of each clip. Right now, the beginning and end of each clip has the same frame. This means the same frame will play twice in a row and will result in a pause.
**Wipes are better suited for some motion.
Test.
At this point, you should be able to copy and paste your sequence to reveal the nature of your loop. If it works well it should play seamlessly. Sometimes you’ll find irreconcilable motion in the background that will need to be frozen later.
Export.
I like exporting at full HD even though packaging it as a GIF will tear it apart. You never know when a full-sized, automatically playing file format will come around (or if you ever want to loop these offline).
Here’s a reel of processed loop files to give you an idea of how short they can be. Click here to see all of the final GIFfed images.
Exporting as a GIF:
I’m using Photoshop CC 2016, but any version should do.
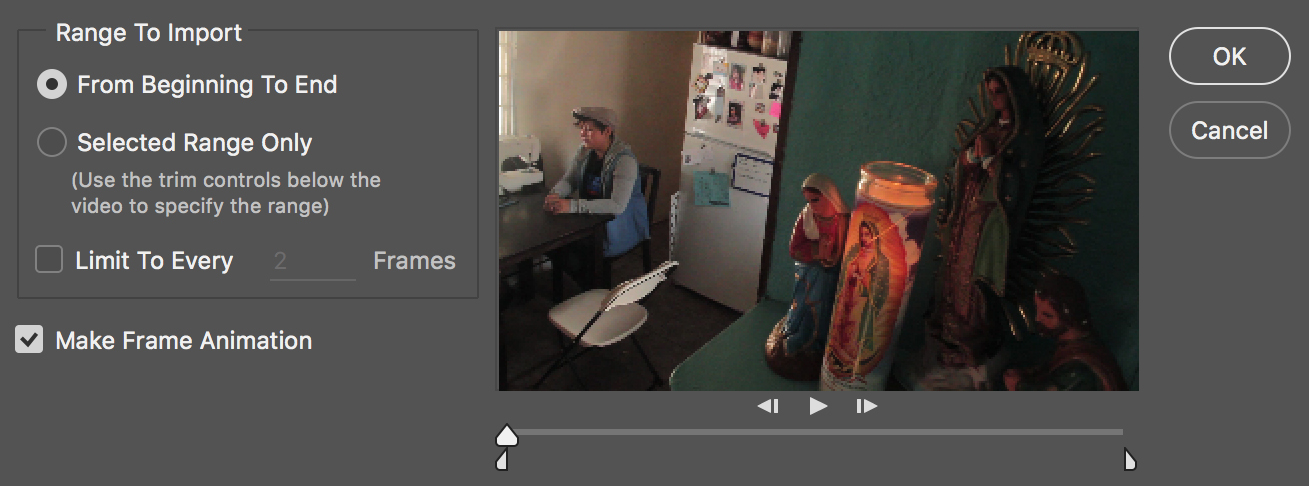
File > Import > Video Frames to Layers

Pick your video file. Take note of the duration of the clip.
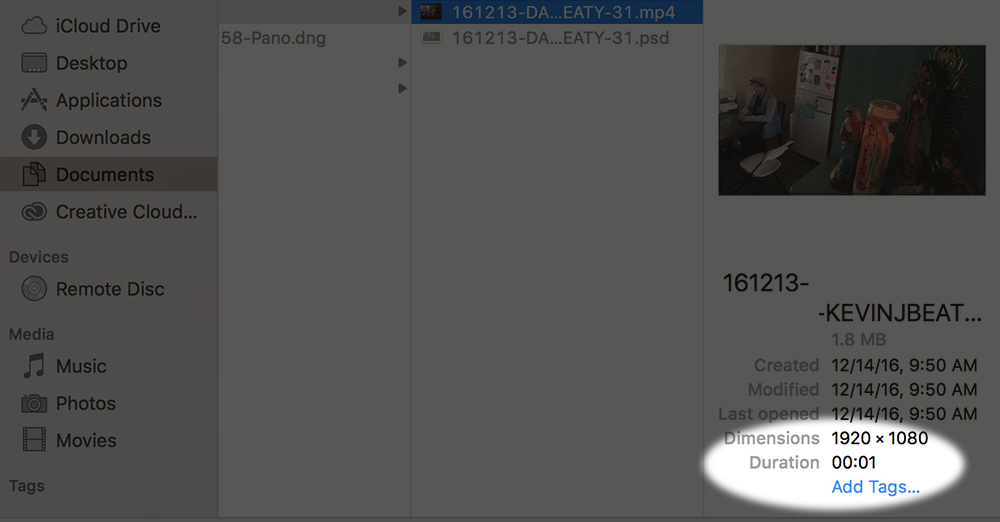
Select range.
My rule of thumb is to “Limit To Every” number of frames based on the duration of the clip. I usually take the duration and add one, unless the clip is really short. One second in this case is short enough to import from beginning to end. Remember that in this stage we’re working to limit the file size. Clip duration is the most costly factor in file size, and as a result we need to limit the number of frames.
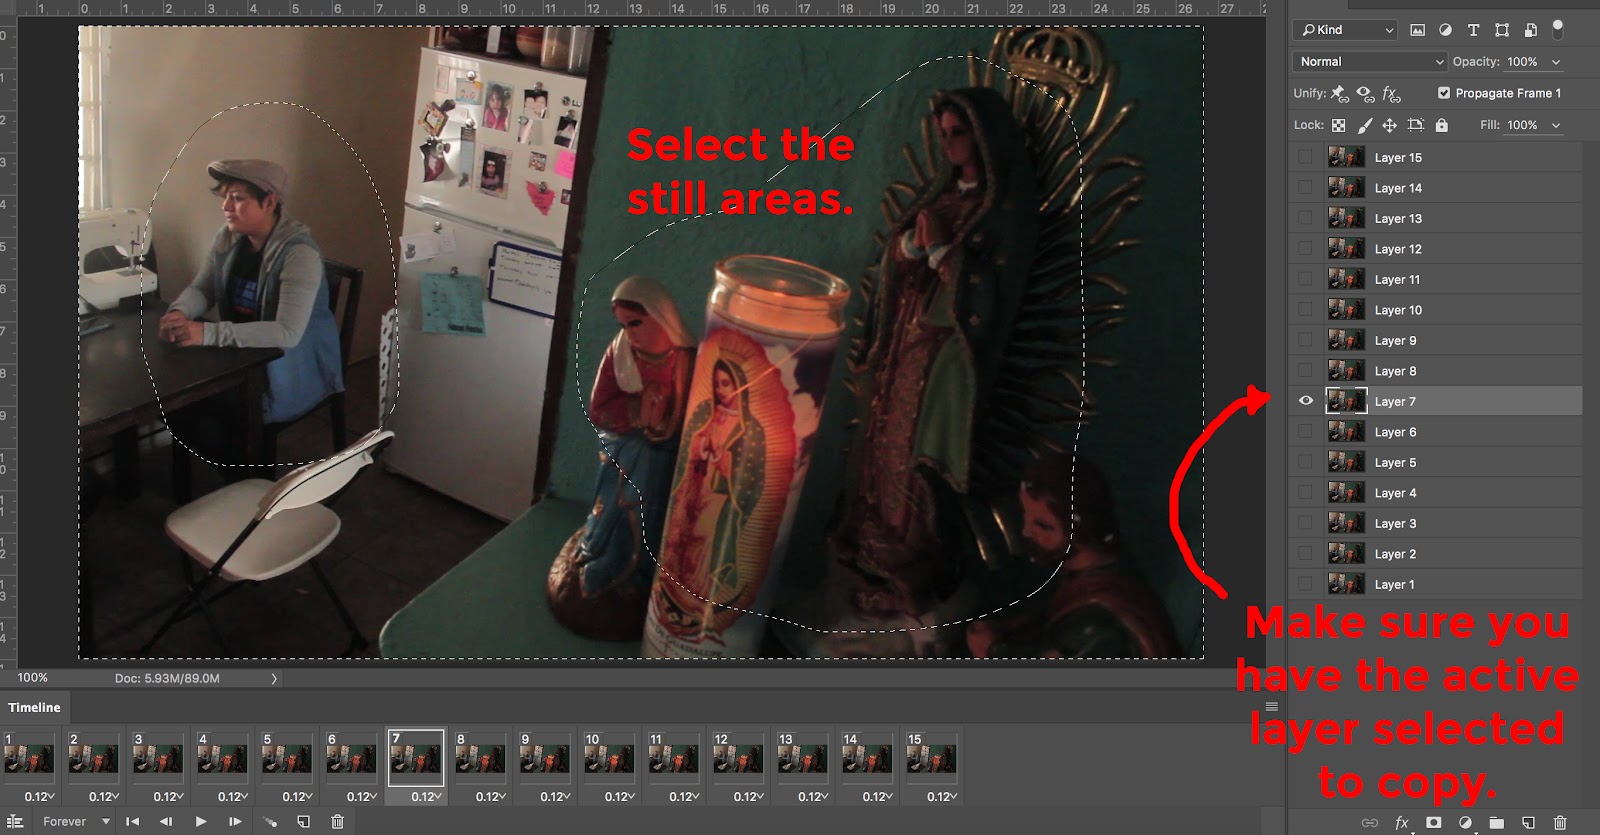
Massage the clip to lower the file size
At this stage we have a few options to pre-emptively lower the eventual file size (to keep it less than 1MB).
- Freeze motion by copying and pasting still areas of the image. Be sure to feather your selections and make sure the pasted layer is on top.
- Delete frames. Maximum frames are dependent on on how much of your image can be frozen. With most of the image covered in this case I’ll guess the original 15 is just fine. I’ve never gone above 20 without having to use seriously damaging compression later.
Set timing.
Timing can be a bit tricky because different browsers play these things at different speeds. That said, expect it to run a hair faster online than you see it in Photoshop, so a little sluggishness isn’t bad.
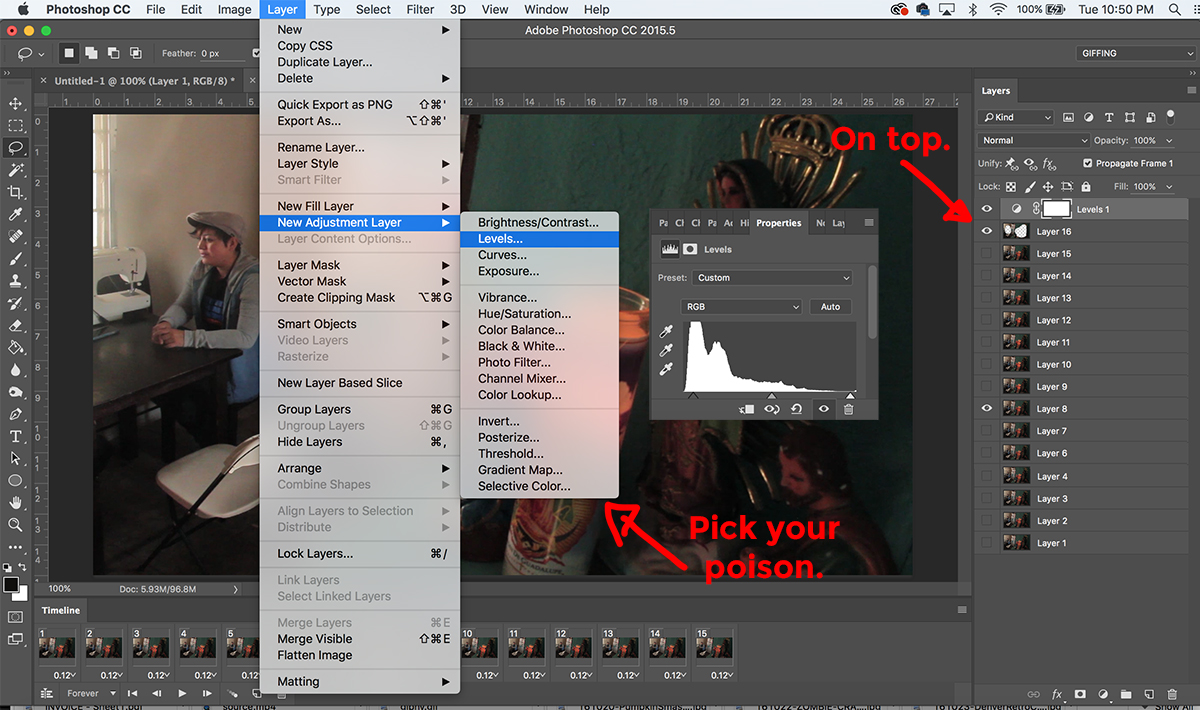
Layer > New Adjustment Layer
It’s a good idea to consolidate your blacks and whites with a “levels” layer since compression later will limit the color range.
File > Export > Save For Web (Legacy)
This is the final step and arguably the most complicated. These options in the impending window control various characteristics of your new GIF:
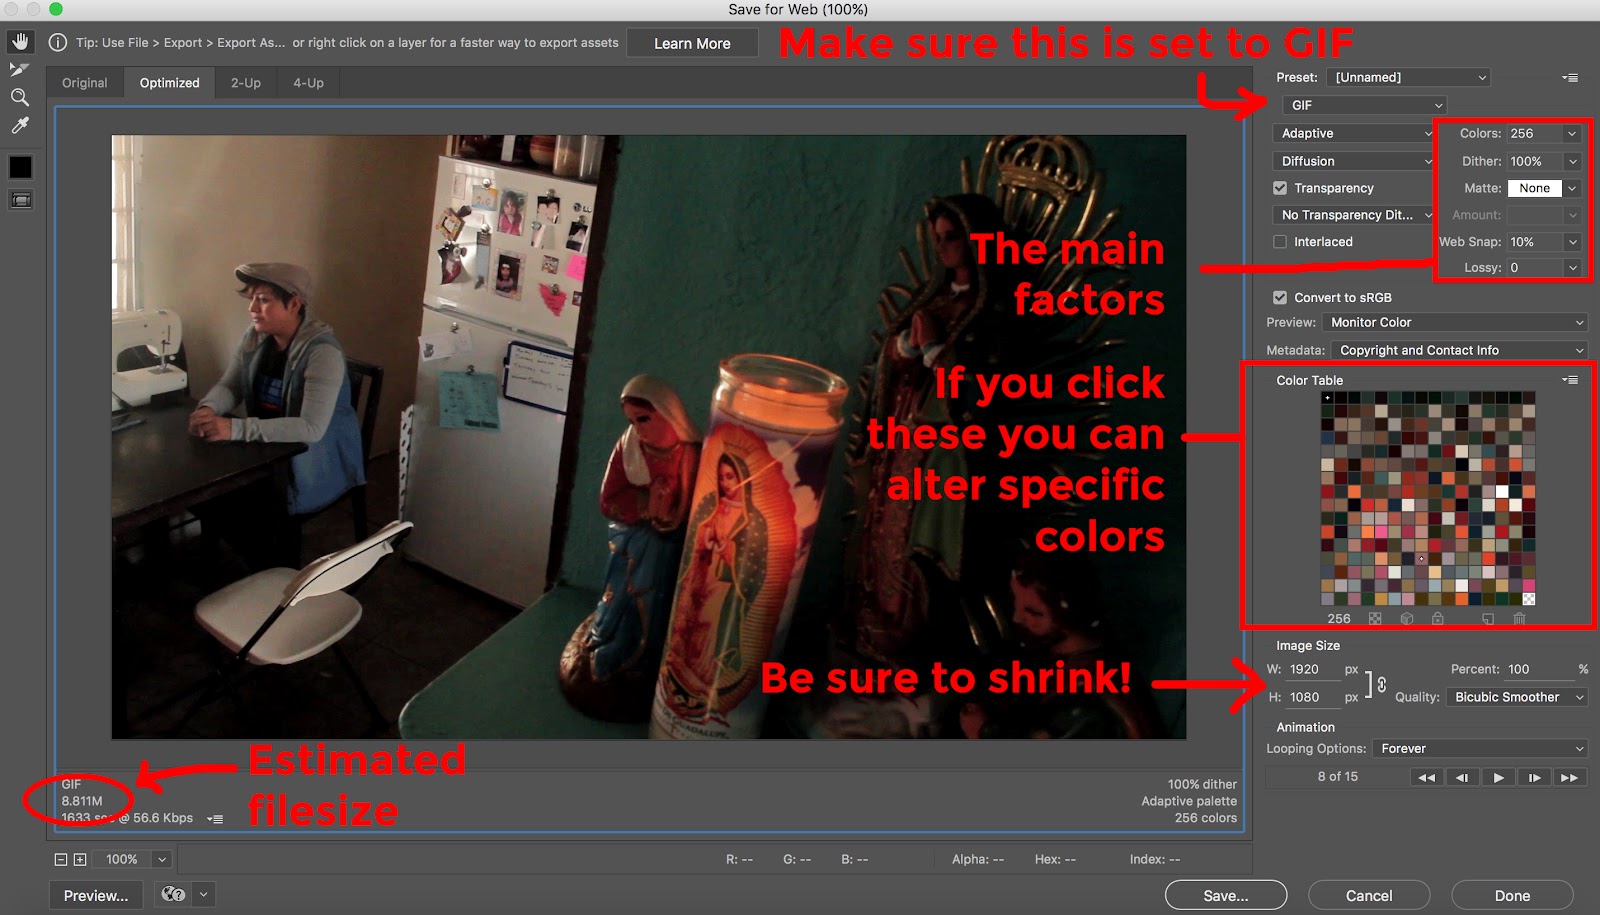
This is all a calculus, something like: File size = Loop Length x Image Size x Colors x Dither x Lossy
Your first step should be changing the image size. I use 600px.
Next are three values whose importance varies by image. The following are examples of exported GIFs with each option cranked down to show you what happens.
-Lossy: This is overall compression. Zero (0) means no compression and each increasing value means a fuzzier image. Switching this from 0 to 5 can make a huge difference on file size without much compromise. This is an example of 60 lossy just to demonstrate how fuzzy it can get.
-Dither: This determines how pointilated colors are allowed to be. 100 percent is the most pointilated. Anything lower will reveal banding where a gradient should exist.

-Colors: Limited to 250. You’d be surprised how few you need. This has 100 percent Dither, 0 Lossy and 40 colors.

Because I picked a very short clip, this GIF could be exported without compromising any of the image controls. Here it is at 0 Lossy, 100 percent dither and 256 colors. It’s 882KB.

Hit save, and there you have it. If you want to see the full range of the medium, check out gifumentarian.tumblr.com/archive.
All of the cinemagraphs on this page were produced for Denverite.com.
Main image CC-licensed by Flickr via Andrew Hitchcock.